 
Alternative Version by
Sonel

Snakelady's Dutch Tutorials
translated into English by
Sonel
with permission from the creator, Snakelady

Snakelady's Original Tutorial
here in Dutch

Vote here for Snakelady's Site
What you need for this tutorial:
Filters unlimited 2.0
This tutorial was written with a lovely scrapkit from
Poppy Scrapkits.
Bev, thank you very much for your permission to use the scrapkit. :)
Download the Scrapkit
HERE
Download the rest of the Supplies HERE
Place the mask in the Mask Folder and open the rest of the Supplies in PSP.
The tube is from Farouche.
Use this pencil to
show you where you are in the tutorial.
Just left click on it and drag it to where you want it to go.
The pencil will stay in position until you close your browser.

Drag and Drop Script: © Dynamic Drive (http://www.dynamicdrive.com)
Open a New Image : 600 x 600 White.
Copy Raster 12 from the kit and Paste as New Layer.
Image - Resize : 85 % bicubic
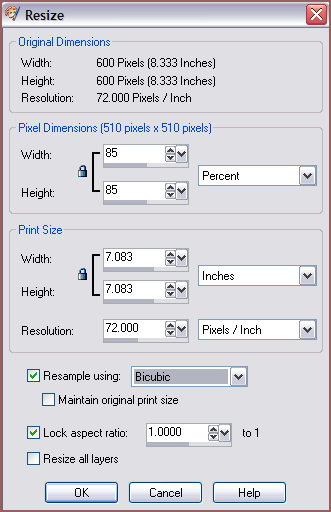
Repeat once (1x).
Selections - Select All
Selections - Float
Selections - Defloat.
Effects - Filters Unlimited 2 - Edges, Square : Square Edge 17.
Selections - Select None.
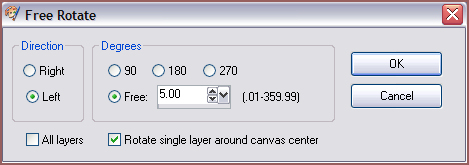
Image - Rotate - Free Rotate : 5 degrees right
Effects - 3D Effects - Drop Shadow : 2, -2, 60, 8 Black
Copy Raster 7 from the kit and Paste as New Layer.
Image - Resize - 85 % bicubic
Repeat once (1x).
Selections - Select All
Selections - Float
Selections - Defloat.
Effects - Filters Unlimited 2 - Edges, Square : Square Edge 17.
Selections - Select None.
Image - Rotate - Free Rotate - 5 degrees left.
Effects - 3D Effects - Drop Shadow : 2, -2, 60, 8 Black
Layers - New Raster Layer.
Selections - Select All.
Copy Raster 10 from the kit and Paste into Selection.
Selections - Select None.
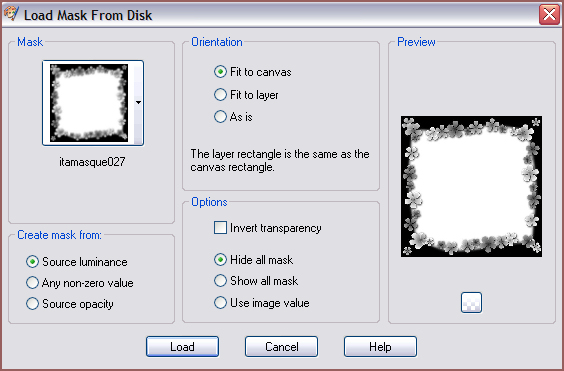
Layers - Load/Save Mask - Load Mask from Disk - look for : itamasque027
Effects - Edge Effects - Enhance
Layers - Merge - Merge Group.
Copy Raster 6 from the scrapkit and Paste as New Layer.
Copy Raster 2 from the scrapkit and Paste as New Layer.
Copy the woman tube and Paste as New Layer.
Layers - Arrange - Move Down.
Move the tube into the frame to fit and delete part of the tube that falls
outside the frame.
Activate the Top Layer.
Copy Raster 8 from the scrapkit and Paste as New Layer.
Layers - Arrange - Move Down.
Copy Raster 14 from the scrapkit and Paste as New Layer.
Move to the left bottom.
Layers - Arrange - Move Down (2x) - until it's under the tube layer of the
woman.
Activate the Top Layer.
Layers - Duplicate.
Image - Resize - 85% bicubic
Repeat twice.
Image - Rotate - Free Rotate : 15 degrees left.

Move to the right and to the top.
Layers - Duplicate
Move this layer below the layer of the bigger frame.
Activate the Top Layer.
Erase part of the frame with the Eraser Tool.

Copy Raster 5 from the scrapkit and Paste as New Layer.
Move to the left and to the top of the frame.
Copy "Copy of Raster 5" from the scrapkit and Paste as New Layer.
Move it to the left and underneath the first flower.
Copy Raster9 from the scrapkit and Paste as New Layer.
Move to the right and to the top of the smaller frame and
erase the part that falls over the frame.
Copy "Copy of Raster9" and Paste as New Layer.
Move it to the top right as well and also erase the part that falls over the
frame.

Copy Raster 3 from the scrapkit and Paste as New Layer.
Move it to the bottom of the big frame.
Layers - Merge - Merge All (Flatten).
Place your watermark and name.
The font I used is called : Ambiance BT Swash.
Alternative Version by Sonel

My lovely sister, Debbie
Back to Top
Do you want to show Snakelady your result of her
tutorials?
Become a member of her showbord and show her what you've made.
This group was specially created for others to show their results.
Click on the Banner to go
there.

I hope you had much pleasure in doing this tutorial.
Please leave the names and watermarks on the tubes intact.
Do not use anything without Snakelady's permission and NO
hot-linking please.
If you want to use her tutorial for other purposes,
please ask permission first.
©Snakelady 23-01-09 All Rights Reserved.
TUTORIALS INDEX
|