

Alternative Version by
Sonel and Snakelady
"De mooie template is gemaakt door
Sonel, zij vertaald mijn lessen in het engels
en daar ben ik haar heel dankbaar voor.
Dank je wel lieve Sophia."
Snakelady have exclusive rights to my
template "SN-Born-Bitch-Tag-Template.psd"
that is included in the supplies and it
may NOT be used by anyone else in any tutorial.
Visit my Blog : ~HERE~
for more Tag templates and Wordart.
Snakelady's Dutch
Tutorials
translated into English by
Sonel
with permission from the creator, Snakelady
Snakelady's
Original Tutorial
here in Dutch

Vote here for Snakelady's Site
Download all the Supplies
HERE
Place the mask : Mask6_Kreations 123123.jpg in the Mask Folder
and open the rest of the Supplies in PSP.
Use this pencil to
show you where you are in the tutorial.
Just left click on it and drag it to where you want it to go.
The pencil will stay in position until you close your browser.

Drag and Drop Script: © Dynamic Drive (http://www.dynamicdrive.com)
LET'S START!
(Remember to save often!)
Open : SN-Born-Bitch-Tag-Template.psd.
We are going to work from the bottom to the top.
Lock the Layer : Logo.
Activate the bottom white layer : Background.
Copy : papier-1.jpg and Paste as New Layer.
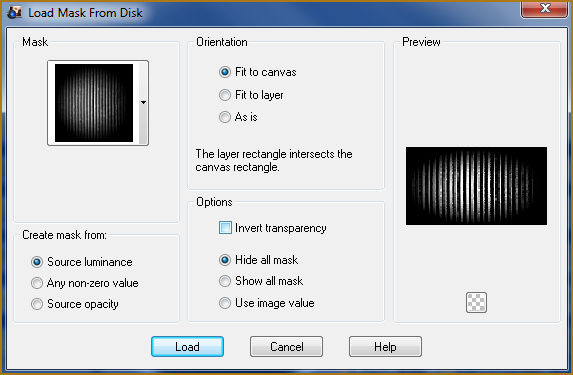
Layers - Load/Save Mask - Load Mask from Disk :
Mask6_Kreations123123,
with the following settings:
Layers - Merge - Merge Group.
Copy : back.pspimage and Paste as New Layer.
Move to the left, with the right side exactly under the grey square.

Activate the Layer : Lines.
With the Magic Wand, select the grey lines.
Copy : papier-2.jpg and Paste into Selection.
Effects - 3D Effects - Drop Shadow : 5-5-50-10 Black.
Selections - Select None.
Activate the Magic Wand again and select the black parts of the
Lines.
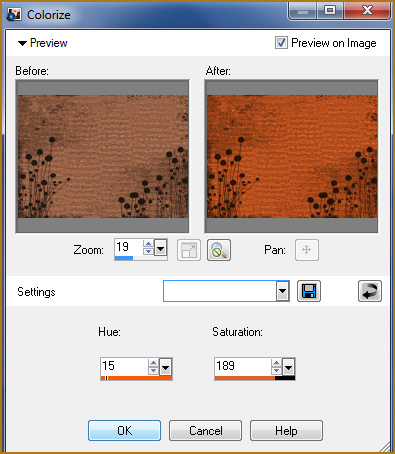
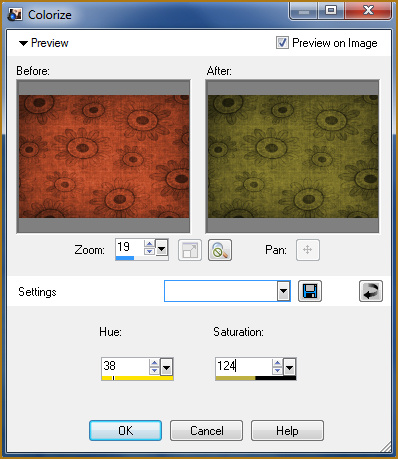
Open : papier-2.jpg, but first we are going to colorize it :
Adjust - Hue and Saturation - Colorize, with the following settings:
Copy the colorized papier-2.jpg, go back to the template and Paste
into Selection.
Apply the same Drop Shadow as before.
Selections - Select None.
Activate the Layer : Square.
Select the grey square with the Magic Wand.
Copy : papier-1.jpg and Paste into Selection.
Selections - Select None.
Activate the Layer : Circle.
Select the black circle with the Magic Wand.
Copy : papier-3.jpg and Paste into Selection.
Leave selection as it is.
Copy the woman tube : SZEKERES-LOOKINGBCKMOVIN_.pspimage and Paste
as New Layer.
Position the tube in the selection.
Selections - Invert
Press Delete.
Selections - Select None.
Apply the same Drop Shadow as before.
Copy : pigtails.pspimage and Paste as New Layer.
Move to the left and apply the same Drop Shadow as before.
Activate the Layer : Wordart
Select the black parts of the letters.
(Remember to click inside the letters as well)
Open : papier-3.jpg and colorize :
Adjust - Hue and Saturation - Colorize, with the following settings:
Copy the colorized papier-3.jpg and Paste into Selection.
Apply the same Drop Shadow as before.
Selections - Select None.
Adjust - Sharpness - Sharpen.
Layers - Merge - Merge All (Flatten).
Place your watermark and name.
Font used : PassionsConflict ROB.
Alternative Version by Snakelady
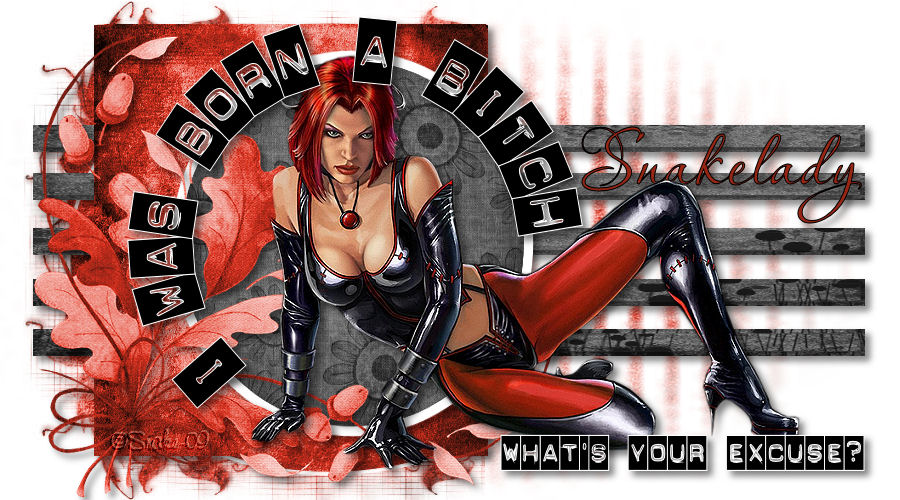
Back to Top
Alternative Version by Sonel
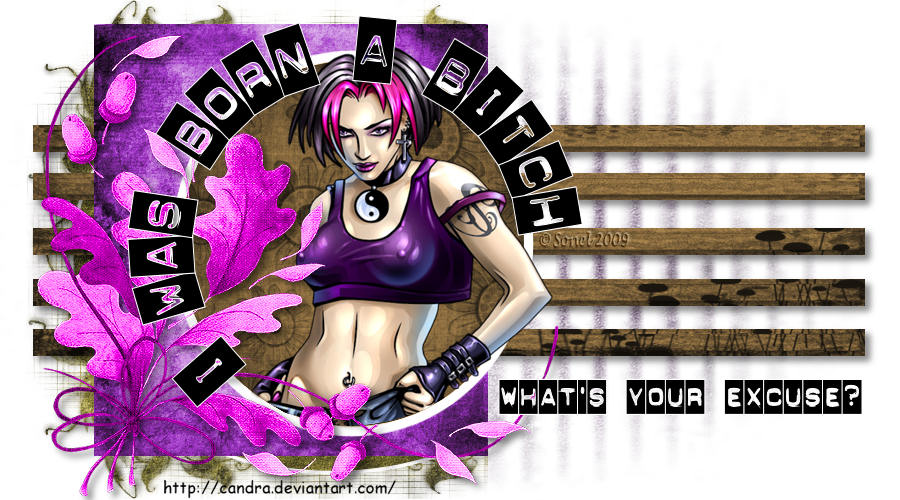
Back to Top
Do you want to show Snakelady
your result of her tutorials?
Become a member of her showbord and show her what you've made.
This group was specially created for others to show their results.
Click
on the Banner to go there.

I hope you had much pleasure
in doing this tutorial.
Please leave the names and watermarks on the tubes intact.
Do not use anything without Snakelady's permission and NO
hot-linking please.
If you want to use her tutorial for other purposes,
please ask permission first.
©Snakelady
24-09-09 All Rights Reserved.
TUTORIALS INDEX |